DANGER
Steam building has been reworked recently. Those docs apply to games made with the Narrat 4.0.0 template. If your game was created before this, you will need to compare your game files (especially package.json, forge.config.js, and electron-main) with the template files to see what has changed and how to adapt your game to the new template.
Steam Integration
Narrat fully integrates with Steam. It has been used for the Steam release of Lovely Lady RPG which includes:
- Steam Overlay
- Steam Achievements
- Steam Cloud Saves
- Steam gamepad support compatible with Steam Input
- Steam Deck native support
How it works
Narrat uses Steamworks integration by default in the template. It should allow any narrat game to run on Steam.
Of course you can modify the template to suit your needs, and could even completely change the Steam integration if you want to use a different library, or even want to replace Electron. That is up to you, but the default template should work for most use cases.
For a primer on how to generally build and export narrat games, see the building and exporting guide
Relevant files
electron-main.js: This is the main Electron entry point and has a lot of specific code to initialize Steam.src/steam-plugin.ts: This is the game side Steam plugin which integrates it with Narrat. It handles achievements, changing the save data path for steam cloud, and a few other technical details.src/index.ts: The Steam plugin needs to be registered in herepackage.json: This is the main configuration file for the game, and has a lot of scripts to build the game for Steam.steam_appid.txt: Contains the steam app id of your game for testing.forge.config.js: This is the Forge configuration file, which has a lot of settings for building the game. Notably the list of files to ignore if you want to make sure to not include your source code or any other folders you don't want to include in the final build.
How to build for Steam
At the moment, building games relies on a few premade scripts which are combined to generate a build. You will have to do some search and replace in package.json to replace some text with the name of your game, but otherwise it should be straightforward.
1. Initial Setup
- Open package.json in VS Code
- Press
Ctrl + Hto open the search and replace dialog - Search for
my-game, and replace that with the name of your game (in the same format ofletters-and-dashes, no spaces, no special characters). - Open
forge.config.jsand replace the name of your game where relevant there too. - Open
steam_appid.txtand enter your steam app id. This will be used to test your game in Steam before release. If you don't have an app id yet, the default value in there of480is Spacewar, the Steam test app, and is fine to use for development.
TIP
It is recommended that you add -steam at the end of your game name, so that Steam saves don't clash with standalone saves from other platforms like itch.io releases.
For example, itch.io builds of Lovely Lady RPG are called lovely-lady-rpg, while Steam builds are called lovely-lady-rpg-steam. This way, saves from the two platforms don't clash.
Be careful to correctly rename your game in all relevant places when doing this
2. Building the game
If you look at package.json, you should see a (potentially overwhelming) amount of possible commands in scripts. It is pretty repetitive, but it allows you to easily create different types of builds (debug, release) for all combinations of platforms (windows, mac intel, mac apple silicon, linux).
A lot of commands build on other commands, so here is a short list of what they do:
copy-steam-[platform]: Copies a packaged game from theoutfolder to theout-steamfolder, adding all the required files and config for it to work on Steam.package-steam-[platform]: Packages a built game for the specified platform in Steam mode, then uses thecopy-steam-[platform]command to copy the files to the right place.package-steam-[platform]-debug: Same as the previous one, but creates a debug build which has useful features for investigating problems.build-package-steam-[platform]: Builds the game in the right mode for Steam, and then usespackage-steam-[platform]to copy the files to the right place.build-package-steam-[platform]-debug: Same as the previous one, but creates a debug build which has useful features for investigating problems.
Most of the time you will want to use build-package-steam-[platform] or build-package-steam-[platform]-debug to build your game for Steam. This will build the game, package it, and copy it to the right place. The other ones are intermediary steps that are used to create the final buiild, but the build-package-steam-[platform] command will do all of that for you, so you don't need to worry about the details.
Example Scenarios
I want to create a debug build on windows:
pnpm build-package-steam-windows-debugI want to create a release build on mac:
pnpm build-package-steam-mac-intelBuild on Mac and Linux
You need a Mac to build for Mac. For Linux you could look into using WSL to create the build. You can also use a virtual machine to create the build and also test it on Steam.
Mac build issues
TODO: Write in better detail about symlinks. Essentially the issue is that if you transfer mac builds to a windows machine, symlinks break, so you need to go in your built mac app, right click on the app to show package contents, then go in Contents/Frameworks, and then in all the framework folders (except the ones with your game name), replace the symlinks with copies of the files they point to. It's kind of tedious and ideally this should be automated, but it works for now.
Steam Deck
Steam Deck is a Linux machine, and this template has been tested to work with Steam Deck natively, so your Linux build should be fine for Steam Deck.
Steam Input issues on modern electron versions
Recent electron versions are breaking gamepad support when Steam Input is enabled. As a developer you can't stop Steam from enabling Steam Input on your game, so the only good solution is to stay on an older version of Electron. As of writing, the template uses Electron 25.2.0 which is known to work with Steam Input.
Testing the build locally
Make sure you have Steam open and are logged in / have access to the game app id you are testing.
Then look in out-steam folder, where your game should be if you're run the build-package-x command. You can run the game in there, and it should open as a Steam app, with the Steam overlay working.
Uploading the game to Steam
First downlaod the Steamworks SDK and put it somewhere on your computer. If you put it in your game folder, make sure to add it to your .gitignore file and to the list of ignored folders in forge.config.js to not include it in your game build.
Then, go into steamworks_sdk_[version]/sdk/tools/ and unzip SteamPipeGUI.zip. You can then open SteamPipeGUI.exe and use it to upload your game builds.
In there you want to fill the following fields:
- App ID: The app id of your game.
- Depot Configuration: If you have a Steam application, in the Steamworks dashboard you can create depots for each platform you want to support. So if you release on Windows, Mac and Linux, you can create a depot for each platform. Then press the
Add Depotbutton in SteamPipeGUI to add your depots with the right Depot IDs - Build Paths: In each depot you have added, set your build path to be the folder of the game for the right platform. For example for Windows, make it point to
[my-game-folder]/out-steam/[my-game-name]-steam-win32x64. - Set live on non-default branch: It can be useful to create a
developmentbranch in Steamworks and put it there, so you can make your testing machine use that branch and won't have to manually promote builds every time you want to test a new build. You can then use theSet live on non-default branchoption to set the branch you want to upload to. - Steam Configuration: Login in there, and also make sure the SDK Content Builder path points to the
ContentBuilderfolder which you can find in thetoolsfolder of the Steamworks SDK you downloaded.
If you have your builds, and you've filled everything correctly, you can then press the Upload button in SteamPipeGUI. It will upload your build to Steam. You can tick Preview Build which will make it do a dry run that won't upload if you want to see what it's about to do.
Once the upload is done, you can go in your Steamworks dashboard, and in the Builds section of your app, you should see your build there. You can then set it live on the branch you want, and it should be available for players to download.
Achievements
Make sure your achievements have the same ID in Steam as in narrat. The Steam plugin that comes with the template will automatically register achievements with the same ID as in narrat, so you don't need to do anything special.
If you want them to have different IDs, you'll need to modify the code of the Steam plugin (src/steam-plugin.ts) to use a different ID for the achievement in narrat than in Steam.
Steam cloud saves
We use electron, so our "save files" are just the localStorage of the electron browser. Electron saves this in different places depending on the OS, but luckily we can configure that easily in Steam.
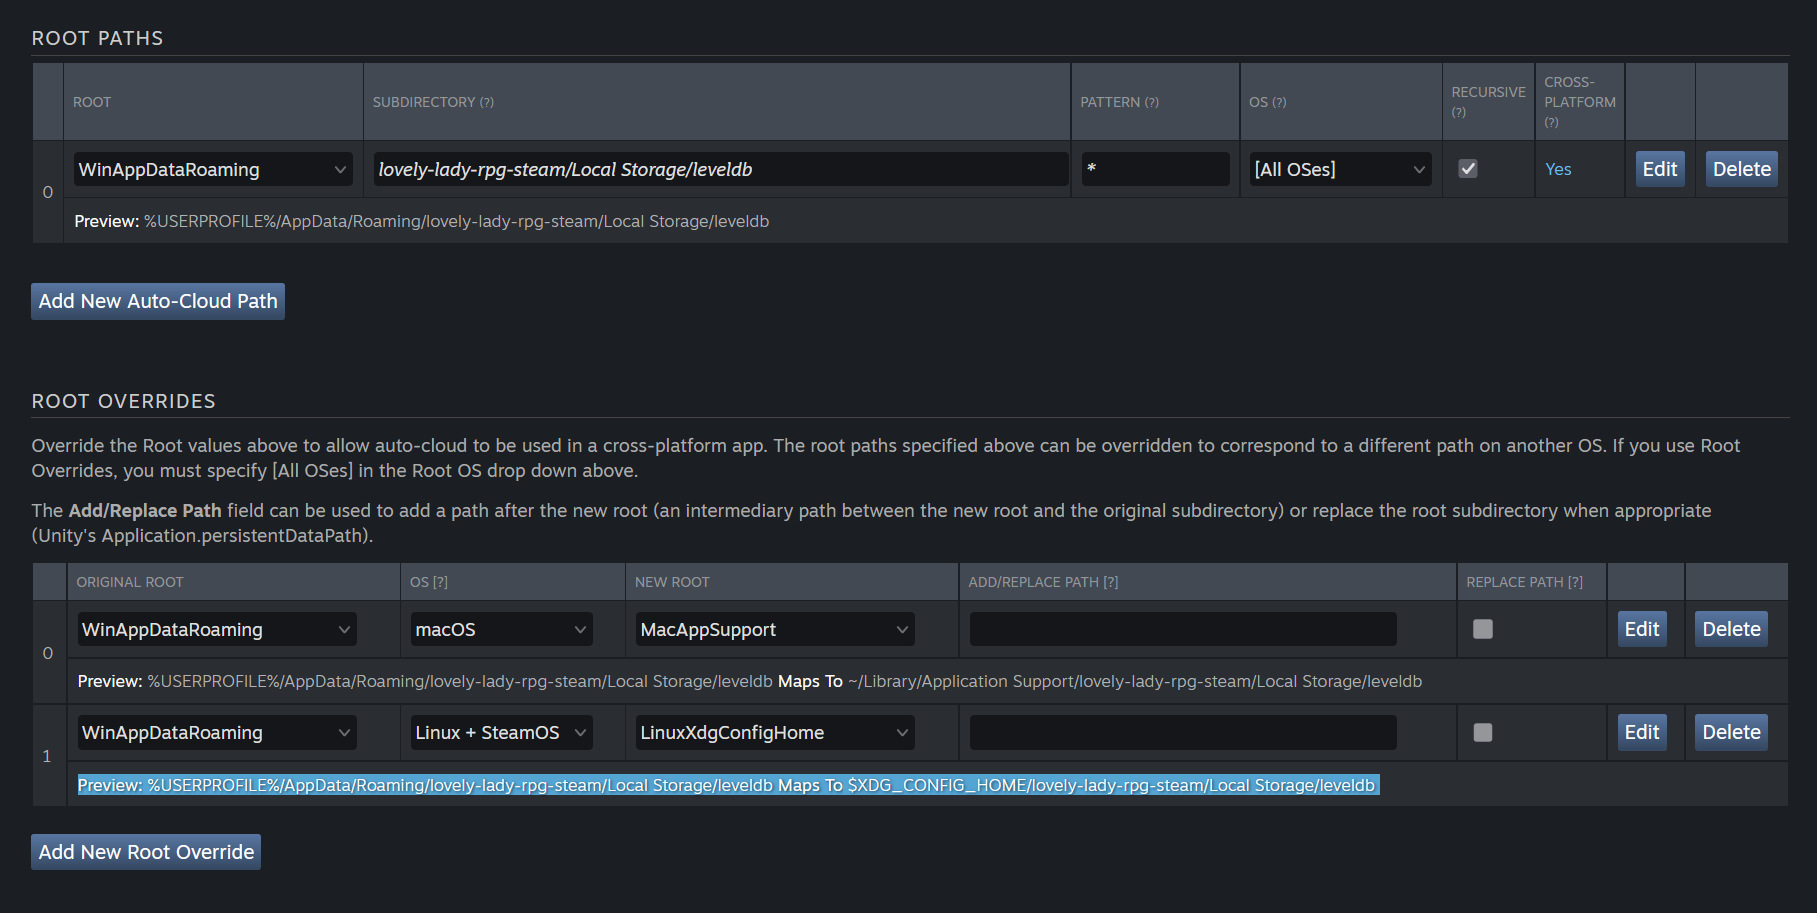
In the Steam cloud save settings, in Root Paths you want one entry, using Windows as the root platform:
Windows
- Root:
WinAppDataRoaming - Subdirectory:
[my-game-name-steam]/Local Storage/leveldb - Pattern:
* - OS:
[All OSes] - Recursive: Yes
- Cross Platform: Yes
Preview should say Preview: %USERPROFILE%/AppData/Roaming/[my-game-name-steam]/Local Storage/leveldb
Then in Root Overrides, you can setup Mac and Linux (or Steam Deck) overrides:
MacOS
- Original Root:
WinAppDataRoaming - OS:
MacOS - New Root:
MacAppSupport - Add/Replace path: Leave empty
- Replace path: unticked
Preview should say Preview: %USERPROFILE%/AppData/Roaming/[my-game-name-steam]/Local Storage/leveldb Maps To ~/Library/Application Support/[my-game-name-steam]/Local Storage/leveldb
Linux
- Original Root:
WinAppDataRoaming - OS:
Linux + SteamOS - New Root:
LinuxXdgConfigHome - Add/Replace path: Leave empty
- Replace path: unticked
Preview should say Preview: %USERPROFILE%/AppData/Roaming/[my-game-name-steam]/Local Storage/leveldb Maps To $XDG_CONFIG_HOME/[my-game-name-steam]/Local Storage/leveldb